Unfortunately, the existing Windows 8 Installation media keys will not work for the Windows 8.1 direct install media as of now. While looking for the regular location of System Image Backup, one might be confusing that there is no System Image Backup option in Windows 8.1 in the regular place. Luckily the option is available in another location for the System Image Backup. We will show how the System Image backup is performed in Windows 8.1. System Image Backup creates a complete system image of the OS at that particular time. It normally includes the installed programs and other settings. This is an actual lifesaver and you will be able to restore your system quickly from the image disc if you have one handy. Hence before commencing, make sure you did the following steps for the best result.
- It is good to perform the System Image Backup, as soon as the installation/upgradation complete. The image size will be minimal in this case.
- Remove the unnecessary files like media files, documents, etc as you can keep a copy of these, independent of the Operating Systems.
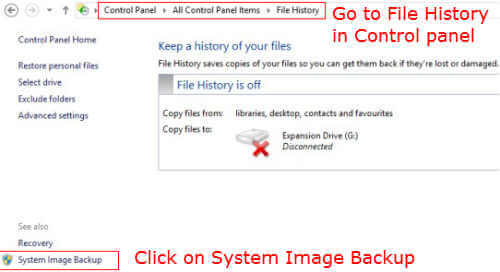
- The essential programs can be installed like your Office(MS Office), Antivirus, etc whereas uninstall all the non-essential programs and regularly updating programs. Later you can reinstall these programs after downloading a newer version. To begin with, Open the Desktop and Control panel. Go to File History. In the bottom left corner, you will be seeing the “Create System Image” option just below “Recovery”. Click on “Create System Image” link.
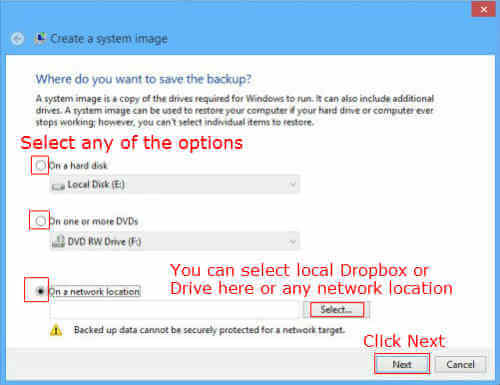
The Backup program will open now. Here we need to select the target device for the system image backup. 3 options are available. 1) Hard disk. 2) DVD ROM. 3) Network location. Remember to select any external devices like external hard disc or DVD’s or Cloud storage like Dropbox, Google drive, etc. If you are selecting Network location then it will be easier, if you already have the desktop cloud apps installed. We can point to the backup folder location in the local cloud directory itself like Dropbox, Drive, Skydrive, Box, etc which will sync with web storage. The recommended option is to take the backup on an external hard disk or DVD drive which will be easier to restore in case of a failure. The size of the backup image will be almost same as the drive usage where the OS is installed. After selecting the backup destination, click on Next for the next window of drive selections.
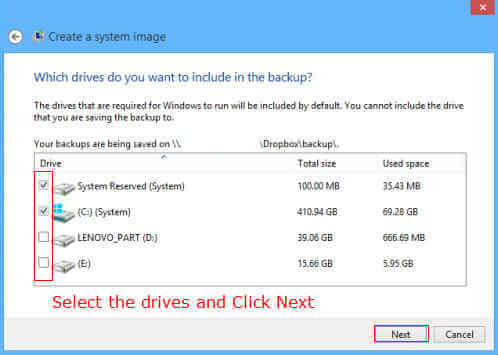
The drives which need to be backed up should be selected here. Here you can add other drives such as the Drivers and essential programs. After selecting the drives, click on Next.
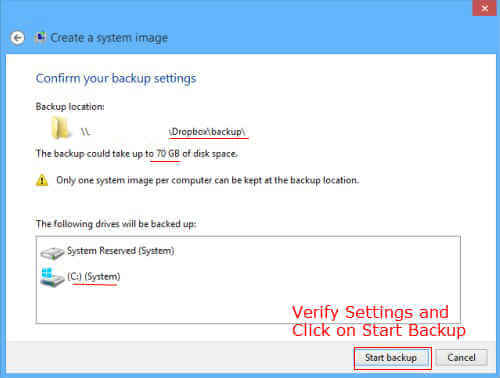
Now you have to confirm your settings. Verify the size of the backup and confirm that you have enough storage capacity with you. Once everything is completed you can give “Start backup” and sit relax. The backup will take hours depending upon the capacity.
Once the backup completed you can remove your media and label it. While you are restoring your system, this media is required and the computer will restore to this particular state of the OS. We may keep the list of other removed programs that can be installed after downloading a new version. In addition to this system image backup, you need to prepare a startup disk or USB drive to use this media if the hard disk failed to boot or upgrading of your hard disk. Click here to know about the Recovery drive creation for Windows 8.1.
Δ