It stands for Basic Input/Output System and is a chip which enables your PC or laptop to perform the basic start up operations before Windows – or a different operating system – loads. However, these days, PC and laptop motherboards don’t have BIOS chips. Instead, they use a new system that goes by a new acronym: UEFI. You can still run these in a legacy BIOS mode, but just about everyone, including motherboard manufacturers still refer to UEFI as “the BIOS”. There are differences between how BIOS and UEFI work, but none of that is really important, because the process for updating it is largely the same. And of course that’s why you’re here, because you want to update yours. There are two standards of BIOS you need to be aware of. The traditional type is being phased out and replaced with newer UEFI chips, although PCs manufactured before 2007 may still have the older version. UEFI created a universal standard for all the major processor manufacturers, as well
Should you update the BIOS?
But before we explain how to do it, an important warning. If something goes wrong during the BIOS update, your PC or laptop could be rendered useless. If there’s a power cut, or the computer gets turned off while updating, it could mean that it’s unable to boot at all. It’s unlikely, but not out of the question. So, unless you have a good reason to, we’d advise you not to update the BIOS at all. Valid reasons for updating include adding support for a new processor that you plan to install, to fix a bug, performance issue or vulnerability, or to add new features that you want or need.
How to update the BIOS / UEFI
Assuming you still want to upgrade, here’s an overview of the process. It’s a good idea to check the exact procedure for your specific motherboard or laptop, as it can vary and, naturally, we can’t provide a guide for every single one of them. If you’re the cautious type, it’s a good idea to make a backup of all important files from your PC before you start. Though a failed BIOS update doesn’t endanger the data on your hard drive directly, it is a pain to access them if the update goes wrong. The chances, as we’ve said, are tiny. But it is a risk nonetheless.
How to identify the make and model of your motherboard
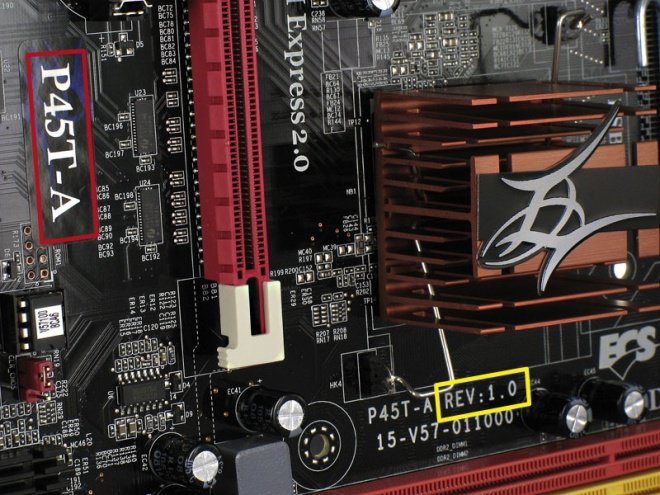
Your next step is likely to be figuring out which motherboard you have so you can download the correct file from the manufacturer’s website. It’s crucial you get the right one, and it’s probably a bad idea to obtain the file from anywhere other than the manufacturer’s site. The full model name – such as MSI Z170A Gaming Pro – is usually found somewhere on the board itself. It’s important as there are usually subtly different versions, and each might have its own individual BIOS. Plus, you should note down the revision number – for example REV 1.03G as it may require a different BIOS file to previous revisions of the board. If you’re updating a laptop, you need only to find the make and exact model of the laptop, and go to the manufacturer’s website. In either case, you should look for the support or downloads section, and look for BIOS or Firmware, and make sure you’re downloading the right file. One way to find out which motherboard you have, and which BIOS version is installed is to use the Windows System Information. Hold down the Windows key+ R to bring up the Run command prompt and type msinfo32 into the box and press OK. The System Information window will appear, similar to the one shown below. Under System Summary, look for BaseBoard Manufacturer, Product and BIOS Version/Date. Sometimes, as in this case, the exact version isn’t shown, so you’d need to reboot and go into the BIOS itself to check the version. You can also see under ‘BIOS Mode’ if your motherboard is set to Legacy or UEFI. Ideally, for modern machines, it should be UEFI. Once you know exactly which BIOS file you need, and have downloaded the right file from the manufacturer’s website, it’s worth reading any instructions – contained in the download or on the manufacturer’s website itself – about the exact updating process for your BIOS. They do vary, and you may need to configure some things before starting the update process, such as disabling secure boot modes and fast boot modes. Most of the time, you just need to extract the files from the zip file and copy them to a USB drive.
Can I update the BIOS in Windows 10?
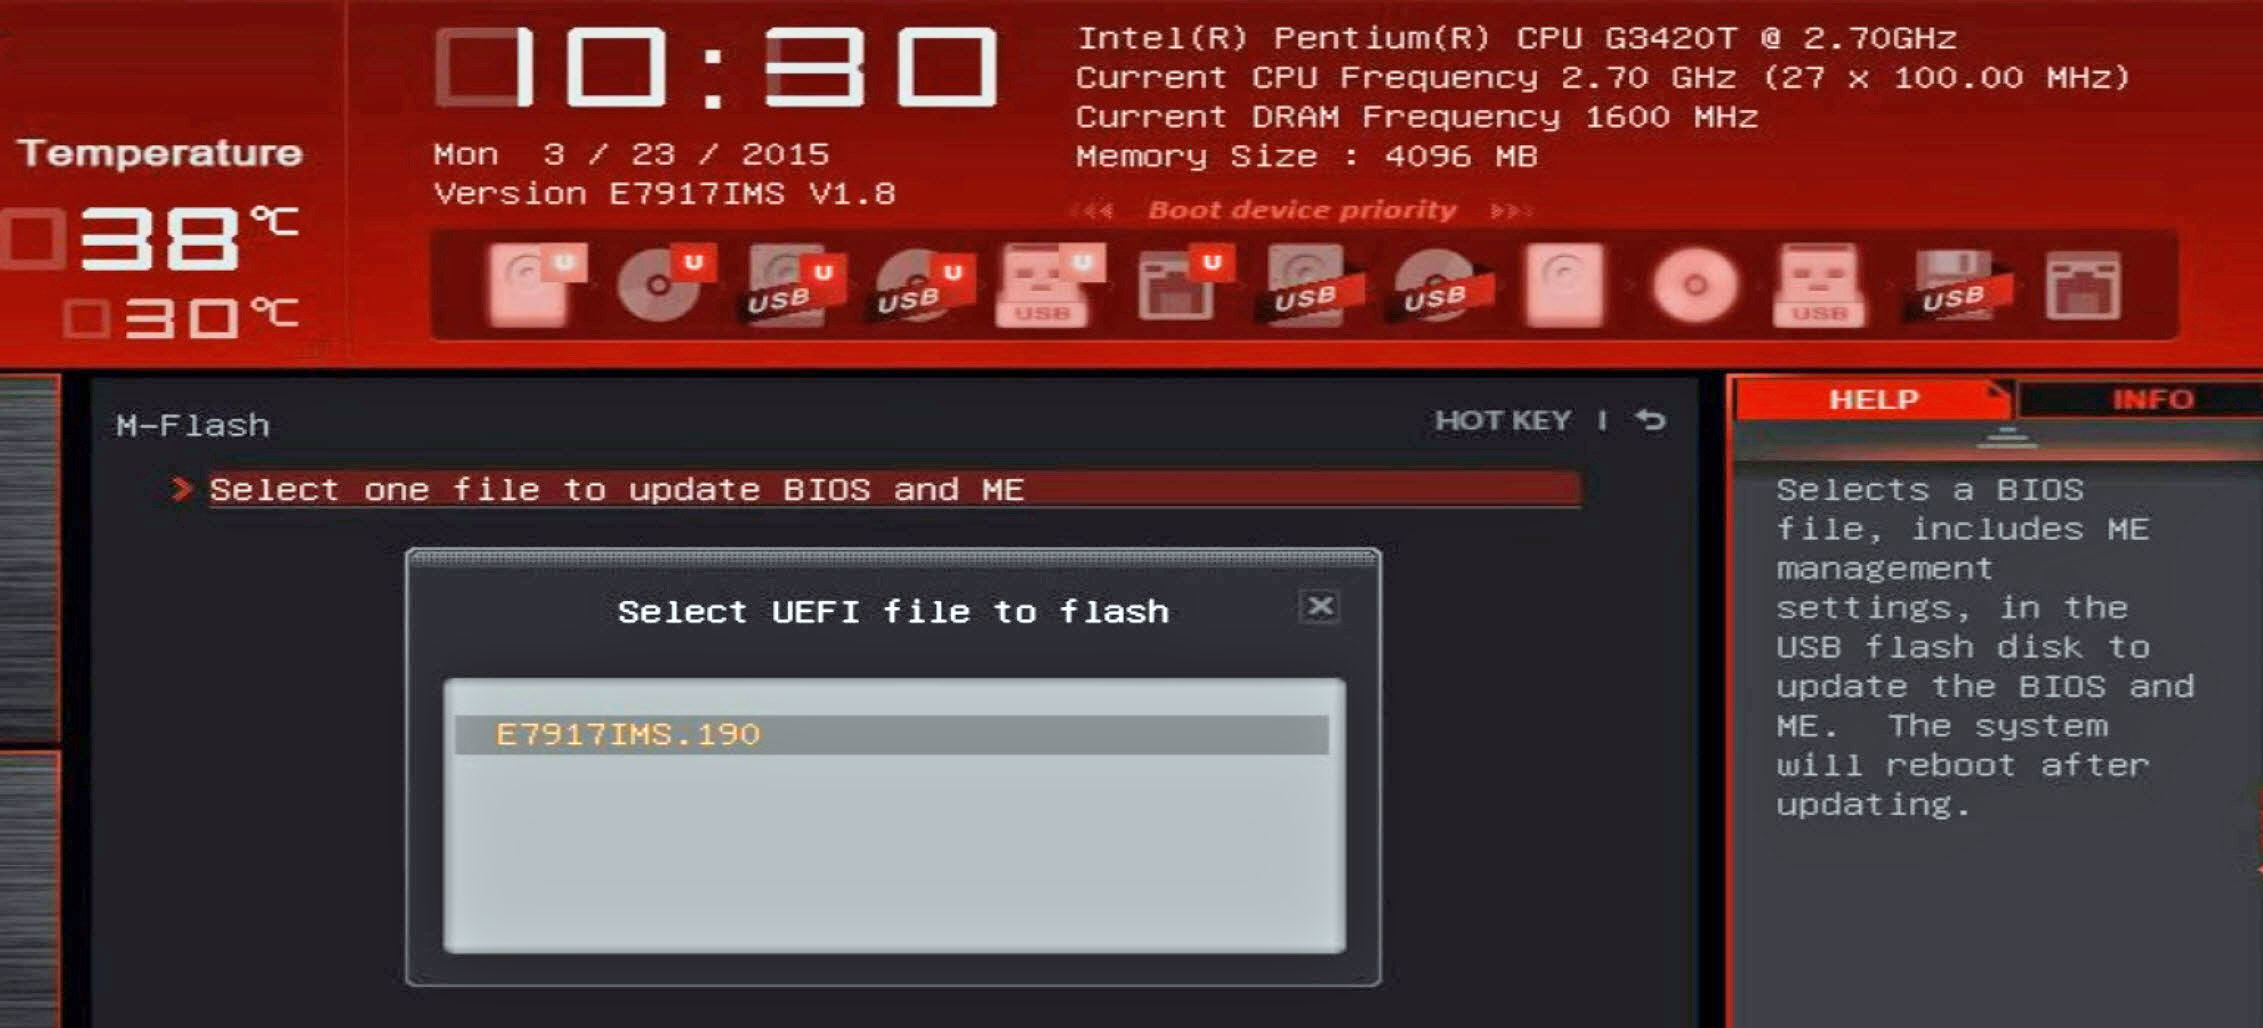
For many motherboards, you can’t update from Windows 10. You will need to reboot and enter the BIOS and search the menu for an option like “EZ Flash” “M Flash” or “Q Flash”. Just follow the on-screen instructions to select the BIOS file from your USB drive. If you can’t access the BIOS, here are some extra tips, especially if your motherboard uses UEFI instead.
However, you may find that your motherboard or laptop manufacturer does offer a Windows app for updating the BIOS. Some laptop makers, including Dell, will even include BIOS updates in their main software updater utility, in which case you may just have to run that. If you see the option to make a backup of your current BIOS before updating, do it. Look for an entry along the lines of “Save current BIOS data” and select a folder to store it in. Follow the instructions in the app to update the BIOS. You might have to point it to the BIOS file you’ve downloaded already, or it might be able to get the latest version automatically from the internet. The progress of the update should be shown, and once complete you may or may not have to reboot your PC for the changes to take effect.
Check BIOS settings
Once the flashing tool has successfully finished updating, you can restart your PC or laptop immediately and resume working with the new BIOS. However, we recommend checking some things first. Enter the BIOS using the appropriate key during boot up. Check the main settings to ensure the date and time are correct, the boot order (i.e. which hard drive is checked first for a Windows installation), and make sure everything else looks correct. Don’t worry too much about the advanced settings unless you experience any problems. If you noted down your previous BIOS settings or know what they should be – such as CPU and memory frequencies, configure them accordingly. Make sure to save your changes before exiting again.
Related stories
How to enter the BIOS to change your PC or laptop’s settingsHow to optimise your RAMHow to Wipe a Hard Drive or SSD
Jim has been testing and reviewing products for over 20 years. His main beats include VPN services and antivirus. He also covers smart home tech, mesh Wi-Fi and electric bikes.