Recently, they have launched a refreshed Samsung Galaxy A50s, which is considered as the successor to A50. Most importantly, each of these smartphones comes with the latest trending specs and premium design. Looking at some more Galaxy A50s specs, it offers 6.4 inches of Super AMOLED Infinity-U display with a resolution of 1080 x 2340 pixels. Besides, it comes in three variants: Galaxy A50s 64GB 4GB RAM, 128GB 4GB RAM and 128GB 6GB RAM. As far as the camera is concerned, it sports 48 megapixels of primary wide camera, 8 megapixel of ultra-wide lens, and 5 megapixel of depth sensor. Whereas, it also includes 32 megapixel of front camera for selfie. To always remain charged, it comes with a 4000 mAh battery with 15W of fast charging support. Galaxy A50s processor is the new Exynos 9611 which runs on the Android 9.0 Pie operating system.
How to Install TWRP Recovery on Galaxy A50s
Do you want to root Android phones? Do you want to install custom ROM? If yes, then you need to install TWRP recovery first. Here, we’ll install TWRP recovery on Galaxy A50s using two methods. First, we’ll use ADB and fastboot commands to flash TWRP. Furthermore, we’ll use Odin Multi downloader and do the same. Besides, you can even try Android apps to install TWRP without a PC.
Disclaimer
Implement the steps given ahead at your own risk. We will not be liable for any damage whatsoever. Do not perform anything on your own.
Pre-Requisites
Ensure to charge your phone battery to a minimum of 50%. Install Samsung Galaxy A50s USB Drivers on your PC before going ahead. Enable USB Debugging on Galaxy A50s. Also, enable OEM unlock mode from the Developer options. This process might wipe your phone data and settings. Hence it’s better to take backup for safety.
Steps to install TWRP Recovery on Galaxy A50s
We’ll go through two methods to flash the custom recovery.
Method 1: Using ADB & fastboot
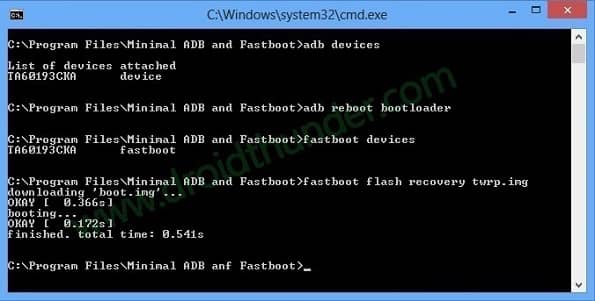
Step 1: Download ADB & fastboot drivers. Step 2: Install it on your computer. Step 3: Download TWRP.img. Step 4: Transfer this twrp.img file to the location C:\Program Files\Minimal ADB and Fastboot folder (where you’ve installed the ADB drivers). Step 5: Using a USB cable, connect your phone to the PC. Step 6: Navigate to C:\Program Files\Minimal ADB and Fastboot folder, hold the Shift button, and right mouse click on a space. You’ll see a list of options from which select the Open command window here option. This will open the cmd window. Step 7: Type the below command in the cmd window and press the enter key: adb devices As soon as you hit enter, a message saying ‘List of devices attached’ will appear. This will confirm a successful connection between your device and PC. Note: If such a thing doesn’t happen, then re-install the latest USB drivers. Step 8: Furthermore, type the below command to boot Galaxy A50s into fastboot mode. adb reboot bootloader Step 9: To confirm whether fastboot is functional or not, type the below command: fastboot devices Note: Few random numbers will confirm that fastboot is functional. Step 10: We’ll now install TWRP recovery on Galaxy A50s. For doing the same, enter the below command: fastboot flash recovery twrp.img
This will initiate the Samsung Galaxy A50s TWRP recovery flashing process. Finally! This is how you can install TWRP recovery on Galaxy A50s using ADB and fastboot commands.
Method 2: Using Odin Tool
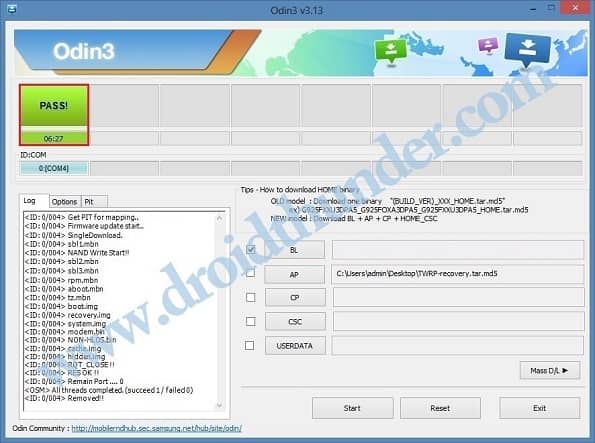
Step 1: Download the Odin tool. Step 2: Download TWRP recovery. Step 3: Switch off your mobile and boot it into download mode. Step 4: For doing the same, press and hold the Power button+ Volume down key simultaneously until the download mode appears. Step 5: Keeping the phone as it is, connect it to the PC using a USB cable. Step 6: On PC, launch the downloaded Odin tool. The ID: COM section will turn blue along with an Added message. This will confirm that your phone is correctly detected by the computer. Note: If such a thing doesn’t happen, then change the USB cable or the USB port. Step 7: Furthermore, check the Auto Reboot and F.Reset Time options. Note: Do not tick any other options. Step 8: Finally, click on the AP tab. Now browse and select the downloaded TWRP recovery.tar.md5 file. Step 9: To start the actual TWRP Samsung Galaxy A50s flashing process, press the Start button. Wait until the flashing completes. As soon as it finishes, the ID: COM section will turn green with a Pass message.
Note: Unfortunately if Odin fails to install TWRP, then close it, again boot your mobile into download mode and repeat the process. Finally! You’ve successfully installed TWRP recovery on Samsung Galaxy A50s using the Odin tool.
Steps to Boot Galaxy A50s into TWRP recovery mode
Step 1: Switch off your phone completely until it vibrates. Step 2: Press and hold Volume up key + Power key simultaneously. As soon as you see the TWRP logo, leave both the keys. Note: If this doesn’t work for you, then try the TWRP Manager app from Google Play Store.
Conclusion
Finally, you’ve successfully installed TWRP recovery on the Samsung Galaxy A50s SM-A507FN smartphone. Go ahead and root Galaxy A50s, flash LineageOS custom ROM, take Nandroid backup and overclock CPU etc. Kindly ask your questions in the comment section below. Notify me of follow-up comments by email. Notify me of new posts by email.
Δ